Build a membership site with Statamic
How to build a basic membership site with Statamic 2 and the Charge add-on.
I no longer really recommend Statamic for a lot of sites. I had real trouble with the quality of certain addons — and whilst I’ve not used Statamic 3 — other developers I work with are using it and are still encountering show-stopping issues, often dropping down to underlying Laravel APIs to get the job done. I think you should either build something custom in your language and framework of choice or use a platform like Ghost if that meets your needs.
If you’re still set on using Statamic then this tutorial will give you the broad concepts but I understand that a lot of the nuts and bolts have changed with Statamic 3. You’ll likely need to work out what the current way of doing each step is.
If you’re getting to the stage where your website has a regular audience and things are on the up, you might want to start trying to make a little 💰 back from all the time you’ve invested.
Whilst no-one has worked out the best way to make from money from publishing online; I think that adding a private members area to your site is still one of the cleaner ways of doing it. If you’ve got something interesting or unique to teach, you might find that some of your readers are willing to part with a few dollars to get access to exclusive content.
Most people immediately reach for Wordpress in this scenario because of the array of plugins that are already available. Whilst this is often the quick & easy option, you get inherit all of the problems that come with Wordpress. Security is a big issue, made more serious if you’re managing payments and personal data too. Customising the templates to take full advantage of the functionality can be a messy affair, and as I’ve already found, Wordpress can leave your precious content in something of a mess!
I much prefer working with Statamic as it’s flat-file content storage allows you to version control everything about a site. Templates…configuration…content…the lot — all stored safely in a Git repo! Built on Laravel, its secure, powerful and easy to customise; and a great starting point for many of the sites that I’ve worked on.
Whilst building a membership site with Statamic is a little more work than installing a Wordpress plugin, the benefits that Statamic brings are more than worth it. You get more control over how your members sign up, and the content that they’ll be able to access.
I’ve built a few membership sites using Statamic recently, so thought I’d write up a guide covering the basics all membership sites will need.
What are we building?
By the end of this tutorial you should have a site with private content that your members can get access to for a few pounds a month. If you’re not familiar with Statamic, go and check it out quickly and then come back. It’s a simple system on the face of it, but it’s got loads of goodies under the hood!
The basic requirements of any membership site are:
- The concept of “Users” with roles and permissions.
- Users can register and later login.
- Editors can publish and edit the content.
- Some of the content is protected, and only accessible to members with an active subscription.
A way to charge your members for access, and for editors to manage their accounts & subscriptions. Fortunately Statamic provides all of this out of the box, except the last requirement. For the billing and subscription management we’re going to be using Stripe via an Addon (what Statamic calls its plugins) called Charge written by Erin, one of the Statamic community’s Addon gurus.
Sidenote: the Statamic community is frankly awesome. I also use a language called Elixir, whose forum is widely considered one of the absolute best examples of what an online developer community should be. Statamic’s is even better…
I’m going to be keeping the pages and templates deliberately simple with a touch of styling from Tailwind CSS. The login and registration pages will be set up as “routes”rather than “pages” within Statamic, again to keep this tutorial focussed.
If you want to allow these pages to be updated using the Control Panel, then you’ll want to set them up as “pages” instead and alter the templates as necessary.
If you don’t want to charge for your members area, you can leave out the Stripe/Charge configuration along with some of the fields on the registration page.
Getting started
To start off, we’ll need a fresh copy of Statamic. Even though it’s not a free CMS, the gents offer a free trial to use during development. A license will be needed if you want to put the site into production.
The install docs cover everything you need to know, but if you’re on macOS then I recommend using Laravel Valet as your local dev environment and the Statamic CLI tool to create a new site.
To install a new site, and clean out the demo content, run the following:
statamic new membership-site
cd membership-site
php please clear:site
When prompted, setup a user and opt to give them superuser status. This will be your admin account.
Clear out everything — yes to all — except on the Clear users prompt to keep the admin account you just created.
Setup users and permissions
Users are pretty fundamental to a membership site, so it makes sense to start with them. Fortunately this is all easy — you’ve already created a user after all!
What we need to do is create a new user “role” and assign it only limited permissions. By default, users in Statamic have access to the Control Panel where you manage your site, which is obviously not what we want our members doing.
Sidenote: Statamic recently added the ability to store users in a database, rather than as flat-files. This is useful if your site reaches a scale that starts to cause performance issues, or if you want to share your users with another system. However, seeing as we don’t need to worry about either just yet 😉 we’ll be sticking with flat-files.
There are two ways to configure your site. You can either update the settings using the Control Panel at “membership-site.dev/cp” or by editing the settings files directly.
Normally, the latter approach is discouraged in other systems to avoid messing things up, but in Statamic flat-files are the secret sauce. Working directly with the files (YAML, Markdown, HTML, etc) is a much faster way to work once you’re used to it.
I’ll be showing you how to do most things by editing the files, but configuring user roles and permissions is one of the few things that’s easier in the Control Panel.
User configuration
Login into your Control Panel, and head to the Users >> User Roles tab at the bottom of left-hand menu.
Once there, create a new role for your members. Unless you want them to have access to the Control Panel (unlikely), leave the settings as per below.
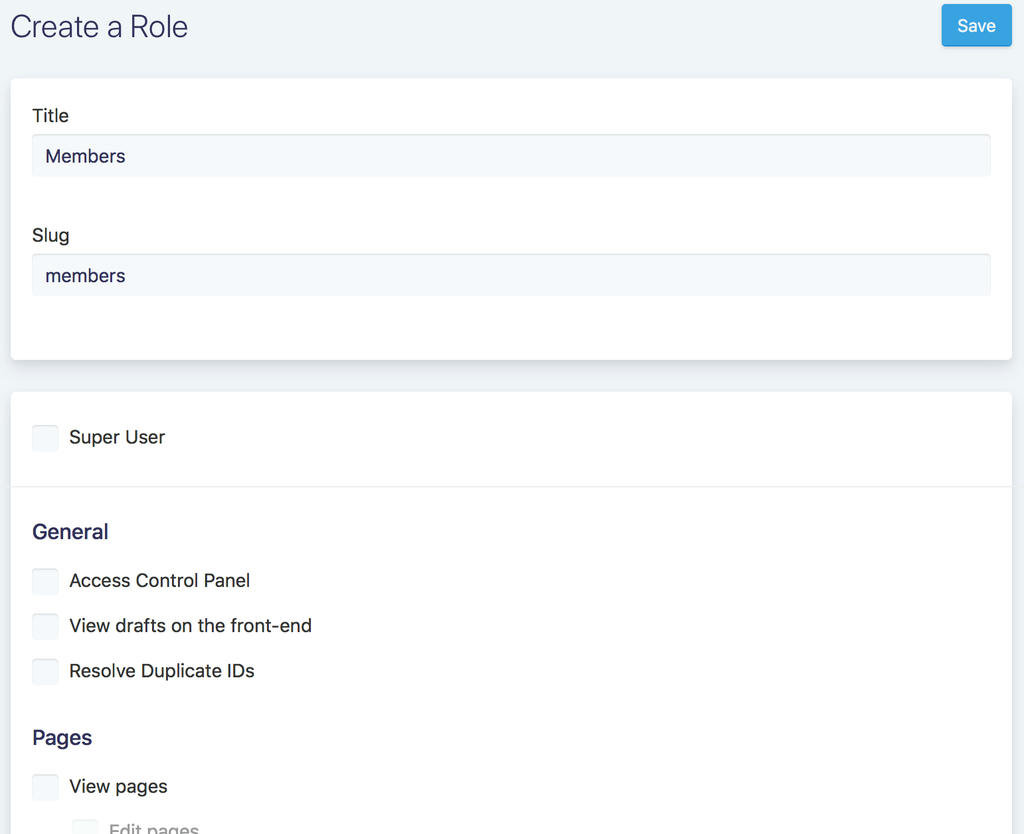
This will allow users to login on the “front-end” of the site, but not give them access to the Control Panel.
At this stage, I like to convert login_type of the users to email.
Statamic allows users to be defined by a username (default) or their email. Personally, I prefer users to login with their email address, as that makes most sense to me and is what I see most commonly elsewhere.
When the users are defined by a username, they are able to login with either the username or their email. However, they are then required to enter their email address as well as choose a username when registering.
This is another field and another decision that you’re asking of potential members, and all adds to the friction of the signup process. Reducing this friction as much as possible will aid conversions. Seems small, but these small details add up.
You can change this setting in the Control Panel (under Settings > Users) or by heading to /site/settings/users.yaml and changing…
login_type: email
Alternatively you can do this using the command line tool php please from the root of the project. This will also change the format of any existing users — the one we created before in our case.
You can do this by running:
php please convert:email-login
Setup Stripe
For the next part, you’ll need to create a Stripe account if you don’t already have one. I won’t walk you through the process, as Stripe makes everything pretty straightforward.
Subscription Plan
Once you have an account, we’ll create your new subscription plan. To do that, head to Subscriptions >> Plans in the sidebar, and click “Create your first plan”.
Here you’ll input the details of your membership plan. You can call it whatever you like, but you’ll need to use the ID later when we configure Charge.
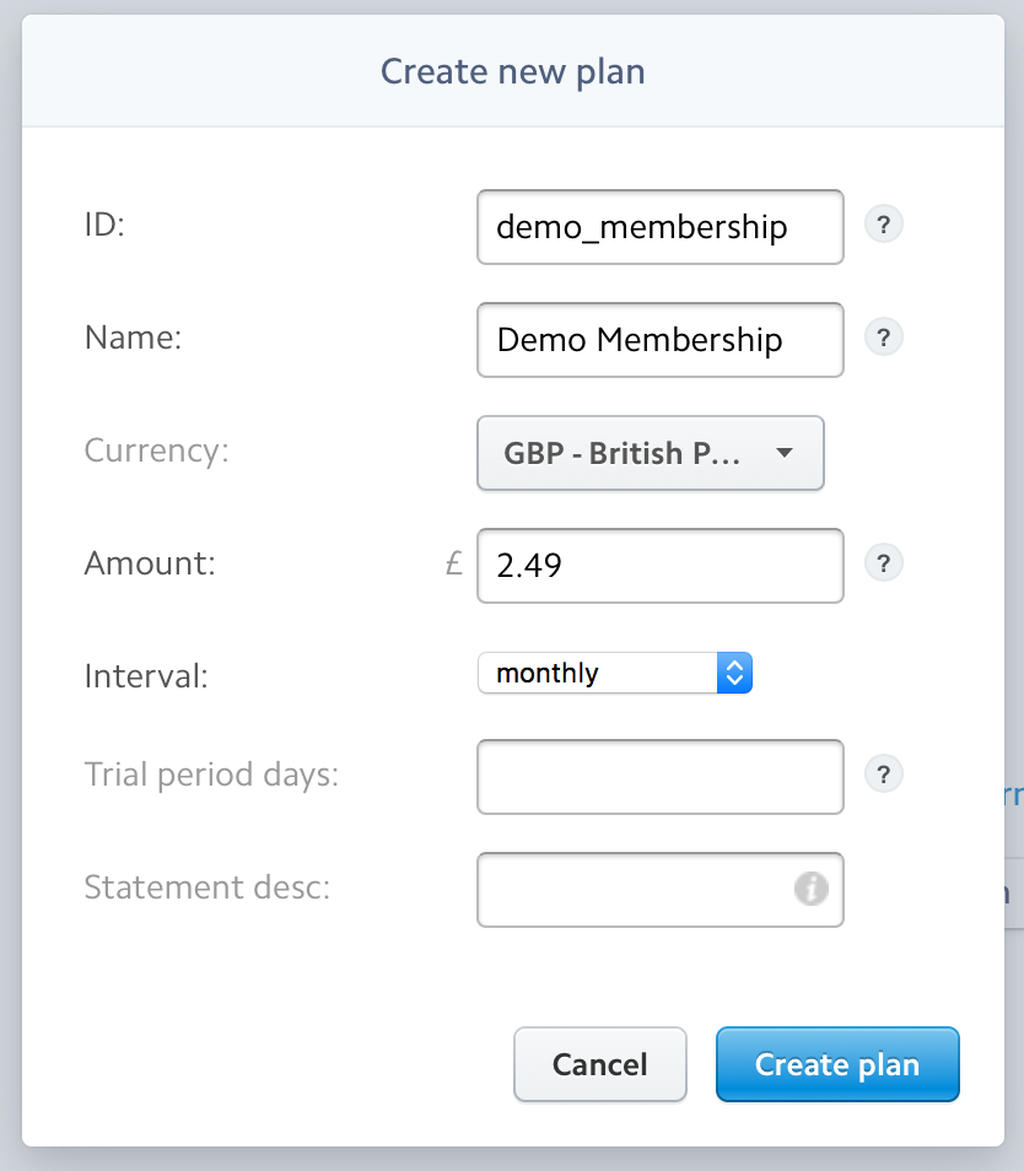
You can see that I’ve set up a plan called “Demo Membership” with an ID of demo_membership which will cost my members £2.49 a month.
I haven’t set up a trial period, and by leaving the statement description blank it will default to the one I chose when I setup my Stripe account.
API Keys
You’ll need to store your public and secret API keys in a “.env” file within the project.
This file should not be checked into your Git repo, and should not be shared between environments.
Statamic comes with a sample .gitignore file that already excludes the “.env” file from the repo.
Rename the sample.gitignore file in the root of the project to .gitignore.
Your API keys are accessible from Stripe’s side menu. Make sure that when you’re developing or testing, you’re using the correct “test” keys.

Sidenote: You will need to set up your subscription plan in both “test” and “live” environments. They are not automatically replicated.
Create the “.env” file and add your keys to it. It should look like this when you’re done, albeit with different keys - obviously!
STRIPE_SECRET_KEY=sk_test_3mQs55ydas7anAGWv1L68XnK
STRIPE_PUBLIC_KEY=pk_test_96FganTn4asda767Wh143w1J7aN
Webhooks
When we come to install Charge in a minute, we’ll need to register some webhooks with Stripe.
These allow Stripe to update Charge (and your website) on the status of your subscriptions. If one of your members payment fails, Stripe can pass that data along to your site through a webhook.
In the Stripe sidebar, head to API >> Webhooks. There you will need to add new endpoint, which will look like this:
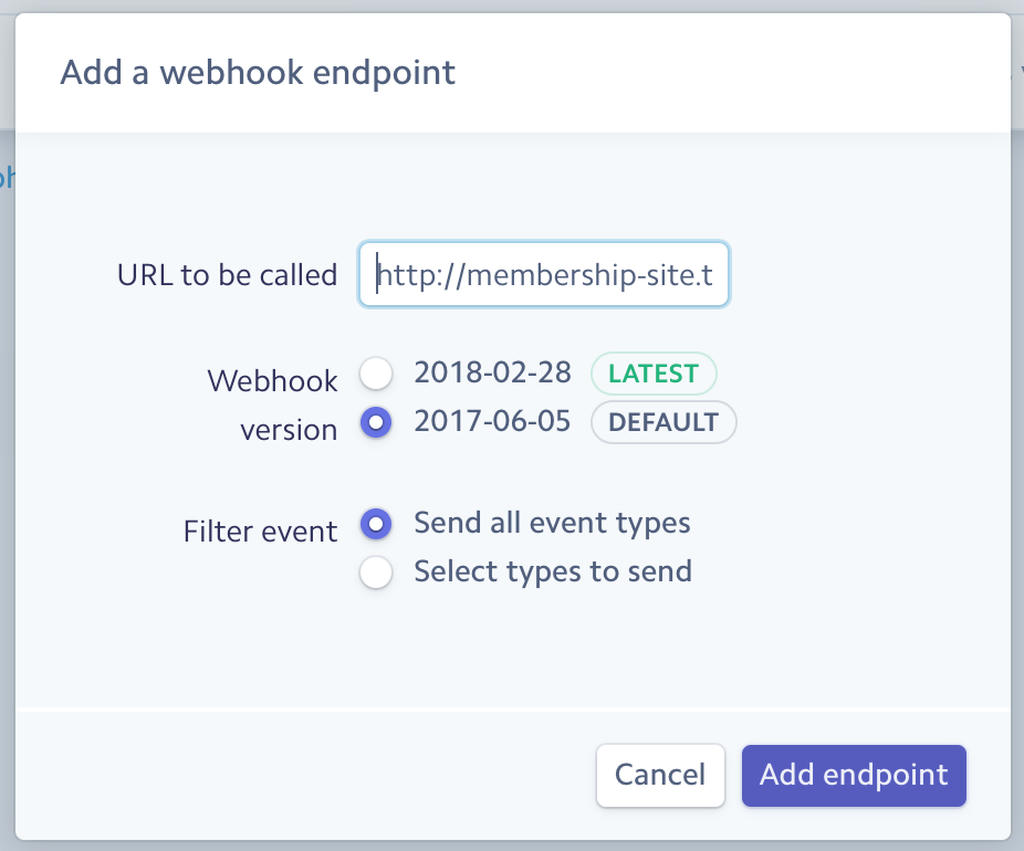
The URL should look like this…
https://membership-site.dev/!/Charge/webhook
…where membership-site.dev is replaced with your own site’s URL.
Again, these endpoints need to be setup for both the “test” and “live” environments. You can add multiple endpoints per environment, so you can add an endpoint for both your local development environment, and a staging or test server before deploying to production (where you’ll be using the “live” keys).
Install & configure Charge
For the next step, you’ll need to purchase and install Charge.
Sidenote: If you’re coming from the world of Wordpress, you might be thinking that $199 for a Statamic license, and $99 for a Charge license is a bit steep. I can promise you, as someone that’s built both a CMS and a Stripe integration from scratch, these tools are worth every dollar, and should pay for themselves with the time they save you.
You install Charge by moving the folder you’re given into /site/addons, and then running…
php please update:addons
…from the root of the project.
Once installed, we need to configure Charge.
We’ll do this in the Control Panel to avoid copying & pasting the ID number of the user role.
Head to Addons >> Charge in the Statamic control panel. There you’ll find a section called “Plans & Roles” which you’ll want to add the ID of the Stripe plan, and select the Statamic role we created earlier.
If you’ve been following along, it should look like this:
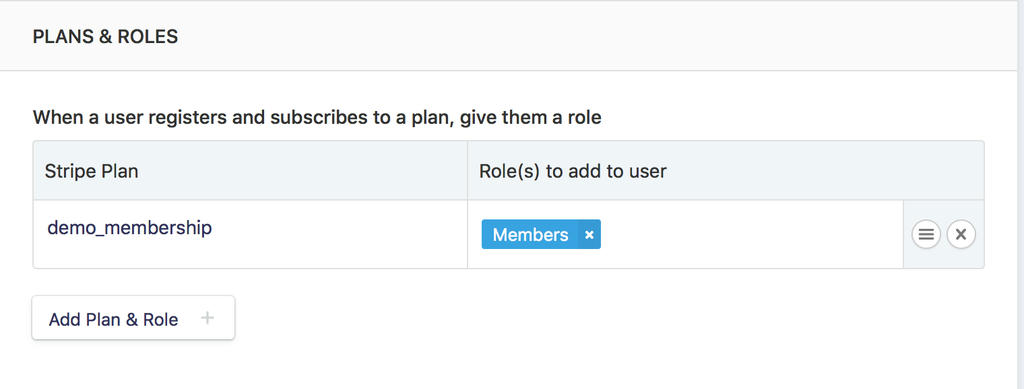
Here, you’ll also find other settings you may want to configure such as email templates and default currencies. I won’t dig into these now, but full instructions for Charge can be found here.
Check that everything is installed correctly by heading to the Charge section of the Statamic control panel. Common issues here are failing to correctly define the API keys in .env or sometimes caused by not running…
php please update:addons
…after install.
Right, that’s all the setup and configuration done; onto building the site itself!
Create a theme
When we installed the site, we opted to clear out the default theme “Redwood”. This gives us a completely blank site, and we only get a placeholder when we visit our development URL.
Whilst we could go and add back all the files we need like layouts, templates, config files, etc; a better option is again using the php please tool.
Head to the root of the project, and run…
php please make:theme membership
…where membership is the name of the theme. At the following prompt, select “yes” to make it the currently selected theme.
This gives us a brilliant scaffold to work with. We’ve got a default layout and templates, all the config files in place and even a sass compilation through Laravel Elixir.
I won’t get into any of that and for now we’ll add the CDN served version of TailwindCSS to the <head> in our default layout.
This will give me some utility classes to quickly style our pages.
Sidenote: “layouts” and “templates” form the basis of all Statamic sites and work in layers. Layouts are the outermost layer and will probably be shared amongst all or most of the pages. They will include things like the <head> and common UI elements like headers and footers. Templates are usually page specific, and are rendered within the layout.
See the Statamic docs for more details.
The Layout
Head to /site/themes/membership/layouts/default.html which was created for you by the CLI tool, and replace the CDN version of Bootstrap on line 13 with Tailwind like so:
<link href="https://cdn.jsdelivr.net/npm/tailwindcss/dist/tailwind.min.css" rel="stylesheet">
You can also remove the Bootstrap javascript and jQuery libraries from the bottom of the layout file (lines 24 & 25).
However, we’re going to need a way to bring in Stripe’s javascript library packaged with Charge, but because you’re a conscientious developer you don’t want to add it on every page — where it might not be needed, or inside the template — where it would be in the wrong place.
Statamic handles such a situation with “sections” and “yields”. You define a “yield” in a layout, and then when you define a “section” in a template, that markup is rendered inside the yield, rather than with the rest of the template.
We’ll create a yield in the layout so that we can add the additional Stripe JS lib on a per-template basis.
Add {{ yield:extra_js }} to the bottom of the layout file.
Your /layout/default.html should now look like this:
<!DOCTYPE html>
<head>
    <meta charset="utf-8">
    <meta http-equiv="X-UA-Compatible" content="IE=edge,chrome=1">
    <meta name="viewport" content="width=device-width, initial-scale=1">
    <meta name="description" content="Jamie's membership site">
    <title>Awesome Membership Site</title>
    <link href="https://cdn.jsdelivr.net/npm/tailwindcss/dist/tailwind.min.css" rel="stylesheet">
    <link rel="stylesheet" href="{{ theme:css }}">
</head>

<body>
    <div>
        {{ template_content }}
    </div>

    <script src="{{ theme:js }}"></script>
    {{ yield:extra_js }}
</body>
</html>
If you want, feel free to add some styling to the layout that you want used on every page (margins, default fonts, etc).
Routing
As I mentioned towards the start, I’m going to be setting up all of these pages as “routes” because there’s no need at this stage to let Control Panel users update content on these pages.
This is done simply by heading to /site/settings/routes.yaml and defining a URL and the template that should be rendered on that page. We’ll go ahead and define all of the routes that we need up front, which looks something like this:
routes:
  /registration: registration
  /login: login
Build the registration form
Now that we’ve got the layout sorted, we’ll build a template where our users can register, and pay for their subscription.
Create a new HTML file at:
/site/themes/membership/templates/registration.html
This page is going to be all about the sign up form, so that seems a logical place to start. Statamic handles this with one of it’s built-in tags. Type the following into the template:
{{ user:register_form  }}

{{ /user:register_form }}
This builds the <form> that all of our <inputs> will sit inside. Behind the scenes, Statamic will handle all the routing and other things like CSRF protection when we hit submit.
We’ll want to add fields for both our user data, but also their card details. When this form is submitted, the user will be created within Statamic, but a customer will also be set up in Stripe, and using the card details, they will be added to the subscription plan we set up earlier.
To make this happen, Charge needs to be aware of this form, which we accomplish by adding a data-* attribute to it like so…
{{ user:register_form attr=“data-charge-form" }}
Next, all of the inputs relevant to Stripe need to be tagged with a similar data attribute, and the field that they represent. An example would be the following, which is the input field for the card number:
<input type="text" data-stripe="number" placeholder="4242 4242 4242 4242" required>
The list of Stripe/Charges required fields is as follows:
- Cardholder’s name
- Registered post code for the card
- The card number
- The expiry month and year
- The 3-digit CVC code (on the rear of the card)
Similarly, Statamic requires particular fields to be present to register a new user. These are:
- Email address
- Name
- Password (and confirmation)
- Optionally if using the default login type, a username.
This looks a little like this…
<input type="text" name="email" value="{{ old:email }}" />
Statamic uses the name attribute to work out what field this input is for. We also set the value using the {{ old:email }} tag to persist inputted data across submissions. Don’t you hate it when making a mistake on a form clears it!?!
The last pieces of the puzzle are the submit button which also requires a data attribute of data-charge-button and a hidden field that instructs Charge/Stripe which plan this user is subscribing to. That looks a little like this…
<input type="hidden" name="plan" id="plan" value="demo_membership">
If you wanted users to be able to select from multiple different plans (perhaps different tiers), you could use a <select> element here instead with a value for each that corresponds to a Stripe plan.
At the bottom we declare a section, and insert the JS required by Charge/Stripe to securely send the users card details to Stripe. This is the {{ section }} that gets rendered into the {{ yield:extra_js }} part of our layout.
Altogether with a little Tailwind styling, it looks like this. I’ve commented it heavily to help explain what each line does.
Phew, that was a lot of code to take in! Try not to get overwhelmed by it; things get easier from here.
Build the login form
The login form is pretty similar to the registration form, but obviously requires fewer fields. The only quirk that I’ve come across is that even though we’re using email as the login type, we still need to refer to it as a username when creating the <input> for it.
Create a file at:
/site/themes/membership/templates/login.html
Statamic provides a…
{{ user:login_form }}
…tag which works in much the same way as the one we used for user registration. However, we’re only going to need an email (username) field, and a password field.
Altogether, again with a little styling it looks like this.
Create some protected content
Next we’re going to create the protected content.
Statamic has multiple ways to protect content, but we’ll be using the logged_in method, that requires a user to be logged in first. To save defining the behaviour of this protection on every page or Collection you want to protect, you can define it once in the system settings, and it will cascade to all instances of that protection.
Head to…
/site/settings/system.yaml
…and add the following to it somewhere:
protect:
logged_in:
  login_url: /login
  append_redirect: true
What this does is tell Statamic what we want to do when protecting content with the logged_in type. Here we’re redirecting an unauthorised user to the login page, and appending a redirection URL to it. This will allow the login form to redirect the user back to the page they were trying to access before being stopped.
Whilst you can protect most content types within Statamic, but in this tutorial we’ll be protecting a simple page.
Other uses are protecting a Collection, which could be a series of articles, podcasts or chapters in a book. Collections can be very flexible!
Pages
If you head to /site/content/pages you should see that you already have an index.md file present. By default, this page represent the homepage of your site (at /) and uses the default.html template.
To add another page, you add a folder with the route that you want, and a similar index.md file inside of it. This file can be empty initially. Go ahead and add a folder called private-content with a blank index.md file inside of it. Now take a look at your page at /private-content in the browser.
At this stage, the page will probably be blank, because the default template doesn’t output anything, and you haven’t added any content to the markdown file. If you go back to the index.md file, you’ll find that it is no longer blank, and has an id number inside of it.
Statamic uses these ids internally to track content and assets. You can delete these ids to your hearts content (Statamic will create another one the next time it’s requested), but you shouldn’t duplicate any files already containing an id as you’ll confuse Statamic.
Modify the index.md file so that it looks like this:
---
title: Private Content
id: 7e91da68-ae58-450e-8f24-09e5d6683d1e
---
# Header
My content goes here
And head back to you browser. It should look like this now.

Statamic is using the default template, which looks like this:
<div class="container">
    <h1>{{ title }}</h1>
    <hr/>
    {{ content }}
</div>
We can see that uses the title defined in the YAML front matter, and then renders the contentwhich is everything below the—marks. By default,contentis parsed as Markdown. Protecting this page this page is as simple as addingprotect: logged_in` to the YAML front matter like so:
---
title: Private Content
id: 7e91da68-ae58-450e-8f24-09e5d6683d1e
protect: logged_in
---
...
If you now refresh the page (checking that you’re not already logged in from earlier) you should be redirected to the login page. If you still see the same page as before, head to the Control Panel and log out (click on the user icon in the top-right of the screen).
Congratulations, you’ve protected some content, and made it accessible to members only. You can test this by registering as a member would using some dummy card details.
Head to /registration and enter all your details. For the card fields, use “4242 4242 4242 4242” as the card number, any future date for the expiry (08/19 for example) and any three digits for the CVC number (e.g. 639).
If all goes to plan, you should see the page we created! Trying to access the Control Panel at /cp with this user account should be denied (exactly what we want).
Log out, and log back in as the original account you created (the one that can access the admin panel). You should be able to see your new customer and their subscription in the Charge section of the dashboard.
Where next?
Now you’ve got the basics going, there’s no stopping you! From here you could set up a collection that’s also protected (adding the protect value to the folder.yaml file).
Another nice touch would be to create a dashboard for your members that indexes all of the private content they have access to, and includes links to manage their subscription using the tags that Charge provides.
If you wanted to provide different subscription tiers (as mentioned earlier) you could restrict content based on a members role by checking for it in the templates: {{ user:is role=“premium_member” }}.
Building out some custom email templates that your members receive when signing up (or cancelling) their subscription could be a professional touch!
As I said at the start, Statamic gives you pretty much all the tools you need to build sites with complex functionality without much work. Unlike a Wordpress plugin, all of this is completely customisable with a huge amount of granularity available when setting permissions or defining content types.
You can find a copy of the codebase here.
Note: only the relevant bits to the tutorial are included here. To run it, you’ll need to grab a copy of Statamic core from their website.